PRINCESS OF THE SEA
Fiber Sculpted Mermaid
by, Donna Ziegler - DZFANTASY
WHAT IS AN ART DOLL?
A brief description might be....an art doll is a one-of-a-kind, 3-dimensional, figurative sculpture, designed and created from various mediums such as polyform clays, paper clays, fabric, wood and/or a combination of any of these mediums. The figures can range from human form, animals, fantasy figures and more. The only limitation is in any artist's imagination! What is YOUR description of an "art doll"?
The "world of art dolls" is a fun, magical world to belong to, and I wouldn't trade it for anything! Happily, the "art doll" has made great strides in being finally accepted for what it is....AN ART!!
While gathering together the "art doll" artists represented here, I found that a common "thread" links us all together, no matter where in the world we live....it is the "passion" to bring our imaginative creatures to life!! It is as important to us as the air we breath! I know it is for me!!
Here you will find a delightful mixture of "art dolls", and the artists who create them. Enjoy the photos, read the artist's words, and get lost in the world of "dolls"!
If you find an artist whose creations you'd like to learn more about, just click on the links below each artist's paragraph. I'm sure they would be more than happy to answer any questions you may have.
Original Art by Griselda Tello
 GRISELDA'S SPIRIT ART DOLLS
 Although painting is my first love, assemblage and art dolls has become an essential spiritual practice. I love the process of sculpting with polymer clay and working with textiles, yarn, fibers and beading, creating a context where magic begins. I've been inspired by many cultures where dolls were made symbolic of the sacred...full of meaning and creativity, I feel there is an element of reverence and solitude that guides me gently into that type of art. This is for me a form of meditation...a beautiful dance with creativity, where Spirit moves me to find inspiration in nature, myth and life itself. My only hope is that people may find in my art a sense of peace.
SPIRAL SUN
 COBWEB
 I started experimenting with art dolls just over a year ago as a result of acquiring a copy of Patti Medaris Culea's excellent book on making cloth dolls. I've always worked with textiles because I love the medium of fabric, the textural and sensual qualities of cloth, and I love the act of stitching. Going from two dimensions to three seemed like a natural progression. I've heard it said that every art doll you make is a self portrait, whether you intend it or not. For me, art dolls offer a way of exploring the other-worldly, magical qualities we all hold inside us.
Cobweb is based on one of the fairy characters in Shakespeare's A Midsummer Night's Dream, which is one of my favourite Shakespeare plays. Making art dolls is something I keep coming back to after a period of two-dimensional work, and I find there's nothing quite like the satisfaction of seeing a unique individual slowly taking shape before your very eyes.
STAR SHINE GALLERY
 Mildred's Christmas Shopping Exhausted Art Doll Sculptureby Patricia Bill
 As the Christmas season begins, we find Mildred out at the mall carrying her heavy bags filled with gifts through the crowds of Christmas shoppers. Someone should tell her about the new and improved way to shop, on Etsy.com!
Mildred is a unique one-of-a-kind sculpture. An art doll creation by artist Patricia Bill. She has been hand crafted of kiln fired clay, wood and paper mache. Hand painted in acrylic paints and detailed with velvet and faux fur, she stands over 16 inches tall. Sure to become a treasured heirloom. She can be found in my Etsy shop - STAR SHINE GALLERY
SERENDIPITOUS WINKS

"MAPLE MOON" by Megan
I create OOAK faerie sculptures using polymer clay over tiny wire armatures. This one is titled 'Maple Moon' and she is part of my private collection. I also sell faeries in my shop and do commissions if requested.
Each faerie begins as a faint whisper in my mind. She slowly develops into an idea over days or weeks--can't rush the creative Muse. When she is ready, she pours out of my mind and hands and into the clay and transforms herself from the figurative into the literal. I might work for days or weeks, and for hours and hours at a time on each sculpture until I am finished. I can become quite complusive about my sculpting and their detailing--barely stopping to eat, drink or rest, as I apply their hair, and hand paint details and sew them clothes. My sculptures come from my inner being and are meant to invoke joy in others. I am naturally drawn to the magical realms and my art has always reflected my love of faeries. These days, now more than ever, it is critical to nuture the magic in our lives.
CW POPPETS

FLOATING MARKET
by Christine
I started making miniature dolls in 2006 when I found James Carrington's book "1/12 Scale Character Figures for the Dolls' House". My first doll wasn't really good, but from that time on I was hooked. So I practiced and experimented and still do... My art dolls are between 6"/14 cm up to 10"/25cm. They are made primarily in polymer clay with some bodys made from air drying clay.While making my dolls I can also indulge in my love for fabric/sewing, history, old paintings and traditions.
OLD WORLD PRIMITIVES
by Stephanie
 The doll pictured above is a primitive folk art Santa doll made of muslin that I painted, sanded, coffee stained and sanded again to give him a time-worn look. His facial features are entirely hand-stitched. His beard is made of wool that I purchased raw and hand-washed myself, and the sweet annie that fills his stocking was purchased from a living historic farm that is still operating just as it did in the 1800s.
ART FEY STUDIO
Wendy Dreams of Neverland
by Zaryana
Art Doll making is a big part of my life (and even part of my personality) that gives me an opportunity through the creative process to dream away from everyday life into the wonderful world of fantasy. I am passionately in love with creating Art Dolls and for me it is as important as fresh water and fresh air.
The process of creating itself has many wonderful aspects to it like: research and brainstorming, sculpting and painting, picking colors, fabrics, and accessories and designing a costume, finding right color, texture, and designs for hair and overall creating a character. The other thing that I really like about Art Doll making is that there is always a room for learning some new and exciting techniques. Also, hearing from my customers that my creations bring joy and happiness to their homes makes me a truly happy person.
FAERYSPELL CREATIONS
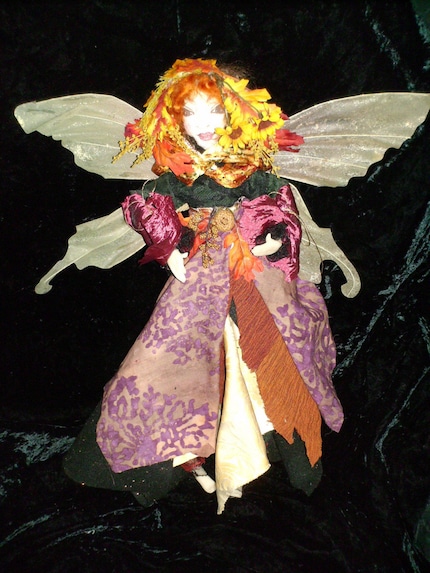
SAMILOVA - Fall Fantasy Faeby Jennifer
Samilova, the Spirit Of The Forest: Slavic Goddess of the woods who is the fierce protector of all animals. She has the ability to shapeshift into a falcon, horse, snake, swan or a whirlwind and would not hesitate to cause harm to anyone who threatens her creatures. She lives deep in the woods and has great knowledge of plant medicine.
I am inspired to create my Faeries and mythic creatures through my fascination with the ancient lore and legends of the Faerie People of all lands. My artistic inspiration comes from Nature, first and foremost. I also love and greatly respect the work of artists such as Brian and Wendy Froud, Alan Lee, Arthur Rackham and Edmund Dulac. In addition to these, my inspiration as a doll artist comes from my love of old world dolls and old fashioned marionettes. I love the quality of a doll being doll-like, and yet seeming as if it could come to life at any moment. I believe this influence shows in my work, and is a part of what makes my dolls unique. My dolls truly seem to me to form themselves--I am only the medium. They emerge from the clay, each with his or her own distinct features and personality--they are always a surprise to me!
PAULETTE CARR

This is one of my favorite dolls. She is also my first "art doll". I was inspired by a pattern in Patti Culea's Beading for the Cloth Doll book. She was a challenge for me, but what a learning experience! Her clothing is made from silk fibers that I stitched between two layers of soluble stabilizer. I then hand dyed lace to match the color of the silk. The flower in her hair is recycled from an old hat!
ADVENTURES IN FIBER (Paulette's Blog)
CAYA'S CREATIONS
 "Petite Poupees"
"Hi, my name is Catherine Gabriel and I live in Australia. I have been making miniature teddy bears and animals for the past 5 years and have recently ventured into cloth doll making. These dolls are called "Petite Poupees" and stand at 6 inches tall. They are made out of pimatex fabric with soft tibetan lambswool hair. The faces and clothes are drawn with watercolour pencils and pigma pens. I have designed these dolls to look almost like an illustration that has come to life."
CAYA'S CREATIONS
MYSTIC REFLECTIONS
 HONEYSUCKLE MYXIE
by CARALYN
I have always enjoyed fantasy art, and have been drawing characters since I was really young...especially fairies. One day a fan told me something that changed the way I approach my art. She said, "I love your drawings, they have so much life, but I wish I could pull them off the page and hold them in my hand." I started thinking about what she said and decided to try a different way to give life to my ideas, and after some research, decided that I would try working with polymer clay. I had sculpted before in high school but never with polymer clay, and I found it was really easy to work with and my "Myxie" fairy sculptures were born. Once I have the sculpture done, I paint their features with acrylic paint and then add hair and make clothing to fit their personality. Honeysuckle is one of my favorite Myxies... I sculpted her using glow in the dark clay mixed with beige polymer clay, and was able to create a soft honey color for her skin. Usually when I am sculpting a myxie, it takes on a form as I go and doesn't turn out as I originally pictured, but I am always happy with how they turn out because they all have their own look and are truly one of a kind. Honeysuckle is special because she is one of the few that actually came out exactly as I envisioned her.
I hope you all enjoyed your visit with all the delightful "art doll" artists that I was so lucky to have participate in this post. We'd all love to hear any comments you may have!


 COLORFUL, WHIMSICAL KNITTING FAIRY
 If you'd like to see more photos and learn more about this delightful "knitting fairy", click on the link below.