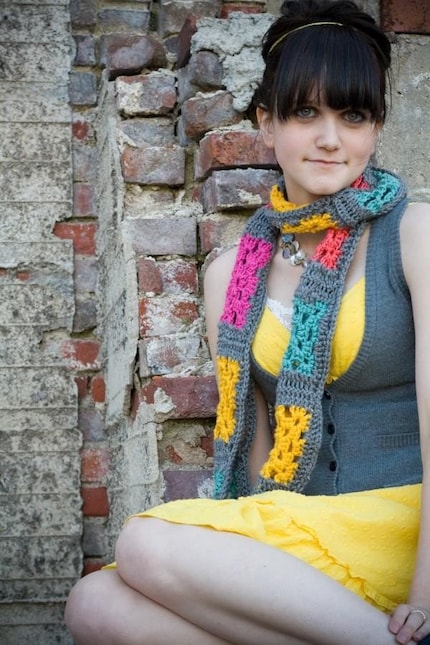
 What a fun colorful scarf! When I asked Mandy to send me a photo of her "favorite item" in her shop, this was her choice. I can see why... it is such fun and full of color!! I'm happy to be able to feature Mandy and her MISSINDIE shop! Don't forget to pay a visit to MISSINDIE after you read below to hear what Mandy has to tell you about herself, and her work.
What led you to start creating your art/craft?
My mom taught me how to crochet a few years ago when I was a sophomore in high school. She taught me the basics, and I instantly fell in love with it. Soon after I taught myself how to read patterns and different techniques and I've been creating ever since.
How did you decide what medium you wanted to work with?
Really, its all my mom's fault! She introduced me, and I fell in love with yarn.
What aspect of creating your art/craft do you find the most enjoyable?
Finding new patterns or creating my own. And yarn shopping. I LOVE shopping for yarn. I swear, I'm like a crack addict when it comes to yarn and a good portion of my room is a yarn stash. Its pretty awesome.
If you had to choose a fruit OR a vegetable, to describe your art/craft, what would you choose, and why?
A mango. Its funky and fun, always different wild colors, and is great by itself or with other things.
What message, if any, do you want to convey with your art/craft?
To be yourself, no matter what. And to have fun with being you.
What advice do you have for other artists/crafters?
Just do what you love. Always. Be creative, and have fun with everything you do.
Lovely, lovely work Mandy...now it makes me wish I would have learned how to crochet when my grandma wanted to teach me years ago!! As I was looking through Mandy's MISS INDIE shop, I came across this beautiful crocheted scarf and thought I'd add its picture out here. THANKS, Mandy, for taking the time to share your work with us.
KEEP ON CREATING!!
Showing posts with label yarns. Show all posts
Showing posts with label yarns. Show all posts
Monday, July 21, 2008
FEATURED ETSY SHOP - MISS INDIE
Labels:
accessories,
crochet hats,
Etsy,
fiber art,
hand-made,
scarves,
shawls,
yarns
Friday, July 11, 2008
HOW TO CREATE A FUN, COLORFUL HAIRDO FOR FAIRIES, MERMAIDS AND OTHER FANTASY FIGURES!
Read below to see how she arrived at looking so pretty!
With all the wonderful, colorful, many textured yarns out there...it is such fun and easy to create beautiful hairdos for fairies, mermaids, or many other fantasy creations. This is a follow-up article on an earlier post I did showing how I create hairdos from my fiber sculpted fantasy figures using the different yarns that are available.
Below is a photo showing our fairy waiting to get her hair styled, and the two yarns I used to create her hairdo.
 For her short, fluffy hairdo I used a hair loom, which I purchased about 10 years ago. I know there are other style looms that can be purchased from various sites that handle "doll making supplies". It has the two wooden ends, with metal rods running through. You can adjust the size by removing the screws and placing them in the different holes which are in each of the wooden ends.
 The holes are spaced 1 inch apart, and are numbered, as you can see in the photo above. I used a spacing of 3" for this fairy's hairstyle. To start the hair, you tie your yarn onto the outer metal rod, as shown in the photo below.
 You then wind the yarn around both rods, keeping the yarn very close together, as shown below. I gauge about how long to wind the yarn on the rods, by determining the figure's head size, and how full I want the hairdo to be. If you find you have too long a piece, you can always cut it off. If you end up with too short a piece you can make another smaller piece to fill in the back of the head. I used about a 4" piece for this fairy's hairdo.
 After you have the length of yarn to where you want it, you center the piece of yarn, (still on the loom), into your sewing machine, as shown below. Starting at one end of the "piece", start stitching down the center until you reach the other end. Use the smallest stitch that you have on your machine. This is important, so that it holds the yarn together when you do the next step of twisting it This is done after you have taken it off the rods.
 After you have sewn down the entire length of the yarn, you need to unscrew the screws and slide the "piece" off the metal rods.
  Below is a photo of my "piece" of yarn after I took it off the metal rods. The next thing I do, is twist the yarn, starting at one end, and ending at the other, so that you have it looking like the photo below. It is then ready to be stitched to the center of the fairy's head.
 The above photo shows the hair "piece" after I stitched the center to her head. To style and shape her hairdo, I then stitch the yarn in place at different points around the head to secure it in place. I also used Fabric-Tac adhesive to shape the yarn around the fairy's face and neck.
 Here she is, all finished, with her short, glistening hairdo all in place. I accented it with a hand-painted, organza flower, with Swarovski crystals sewn into the center of the flower. She is now available for purchase out in my DZFANTASY shop on Etsy. Click on the link below if you'd like to see more of her.
Subscribe to:
Posts (Atom)


