


 In my previous post "HAVE YOU EVER SEEN A MAPLE LEAF THIS SIZE", I showed the steps of how I created this huge, silk maple leaf, whose template was created from one of the largest maple leaves I've ever seen....11.75" long x 11.25" wide, when I found it.
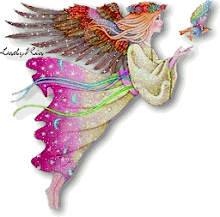
Above you see the completed creation, which I designed entirely of 100% silk. Below you will see the steps taken to complete this colorful, fiber fantasy wall art.
 Dyeing the "face" fabric
Here I have hand-dyed/painted the silk fabric , which I will use for the fairy's face. I brushed on the Dye-na-Flow liquid paint using a brush, just as I did with the leaf. I watered down the colors so I wouldn't have too dark of a face. After the fabric was the desired color, I pressed it dry with my iron.

Preparing the fabric for sewing
After I pressed the fabric dry, I ironed interfacing to one side of the fabric so that I could trace the face template onto the fabric.

If you will note in the picture, I have a tiny "+" drawn in the center of the face. I cut this little "opening" before I stitch the face so that it is easier, when it comes time to turn the face right side out.

The face is now sewn with the tinest stitch that my machine allows. Next it is being turned inside out.

 Now the face is being stuffed with acrylic fiberfill. I was amazed at how much fiberfill it took to stuff this size face. It measures approximately 3" long and 2.25" wide. Lately, I 've been making teeny, tiny faces for my butterfly pins, so this was a big change of pace!

 In this photo the fairy's face has now been completely painted, and is ready for her hair.
Her hairdo was designed from a gorgeous, wispy, sparkling yarn with a texture of wispy eyelash, and poofs of color.

Her hair accent is a charming glass dragon fly accented with a string of 8mm Swarovski crystals. They are rather hard to see in the photo. She also has the same yarn as an accent at the base of the leaf, and more 8mm Swarovski crystals hand-sewn into the yarn.
The entire sculpture is now completed!! She will soon be out in my DZFANTASY shop on Etsy.


4 comments:
I have found a new love! This is unbelievably gorgeous! What a fantastic blog! Beautiful work and wonderful tutorial! Thank you so much for for commenting on my blog....I am so glad I found you!
Warmly,
Leslie G.
Great post, Donna!
I enjoyed this tutorial so much Donna. Oh my, a maple leaf that big? WOW! ~ She's beautiful!!
She truly is a beautiful wall sculpture. Her vibrant fall colors are heartwarming. Thank you for giving the tutorial.
Blessings,
Angelina
Post a Comment