


Mermaids have fascinated mankind down through the ages...! I think it is always fun to see all the different styles and mediums used by artists to create mermaids. My mermaids are colorful, whimsical creatures, which I design and create entirely out of fabric. I hand-draw, needle-sculpt, and hand-paint each face individually.
Here I will try to show you several of the steps involved in creating one of my smallest mermaids. She is only 6.5" tall. Her fin span is 5". The upper bodies of all my mermaids are 100% silk tussah fabric. Tussah silk is a silk derived from wild moths, whose main diet is oak leaves. The amount of tannin in the leaves determines the natural color of the silk.
Below is a photo showing my original template ( I tend to scribble on them to get my pens started) for the upper body, along with the the fabric and the upper body drawn onto the top side of the fabric. I use a very thin interfacing which I iron onto the silk fabric. It is on this side, that I trace the pattern. The interfacing allows me to draw the pattern without actually drawing onto the silk. It also provides a stronger piece of fabric. A lot of stress is put onto the fabric when stuffing. I also use the smallest size stitch on my machine to actually sew the body pieces.
 In the photo below you will see the 3 parts that make up this tiny little mermaid...her tail was created from a batik fabric. The tail fins were first stuffed lightly with acrylic fiberfill. I then top-stitch a design on the fins. Next, I insert fabric coated floral wire into the sections of the fins, so that when she is finished you can bend them up or down a bit. After the floral wire is in, I clip it so that the wires reach about .75" below the waist opening. I then finish stuffing the rest of the tail. That is what you are now seeing in the photo below.
  The upper portion of the body has been cut, sewn and firmly stuffed with acrylic fiberfill up to about the waist. The next step is to insert the upper body portion into the top of the tail. Her head has been sewn and stuffed with fiberfil, and will be added to the body later.
 The photo above shows the top opening of the tail. This is the hard part...getting the little upper body to fit perfectly into the top of the tail, and hold it there while I hand-sew it into place using clear fishing line.
 OK...now the body is attached at the waist!! Next step is deciding what yarns I want to use for her waist accent and hairdo. For this little mermaid, I've used 4 different yarns.. 3 "eyelash" style yarns in various shades of green, and a sparkly yarn that will make her glisten, as if she just came out of the sea!
The next step will be to give our little mermaid a belly button, and sew a Swarovski crystal into the center of it. Then I will finish up with the stuffing of her upper body. She will have fabric coated floral wire armatures in her arms, so that these also may be bent up or down a bit......!
 TO BE CONTINUED....Be sure to stop back and see how our little mermaid is progressing!
WELCOME BACK....to The Birth of A Mermaid
We now find our little mermaid with her Swarovski crystal belly button in place, and her upper body firmaly stuffed.

 The next step was attaching her head to her body as shown in the photo above. At this point, I then decide what she will be wearing for her accessories and accents.
She is wearing a necklace which I designed using 4mm Swarovski crystals, and real little sea shells strung on colored wire. She also has crystals and sea shells sewn at her waist.
Now comes the best part....I love creating the faces, which is when each creation takes on its own little personality....!
COME BACK TO SEE HER FINALLY COME TO LIFE!
Tues, May 3rd: We are now back to see the final steps taken before the little mermaid "came to life". Below is a photo of the needle sculpting of her face: I start at the bridge of the nose, work down, create her nostrils, and than go into the corner of the mouth, and up to the outer edge of the eye.
 I have several other tutorials out here which show the steps I take to create the faces, so have decided not to show each step here. After the face is sculpted, I hand-paint the eyes and lips using acrylic paint. The eyelash are applied using a Micron pen size .005. The eyes and lips then get a coat of crystal clear 3D lacquer by Sakura, which gives the faces a very "life-like" look and shine. The face is also sprayed with a matte finish sealer by Krylon, so it will not run or smear.
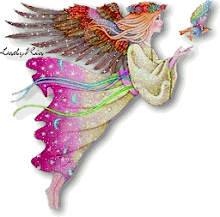
AND NOW......HERE SHE IS...........!

 She just sold at an art show today! (6/7/08)


3 comments:
she is amazing! love watching her progress:)
She is wonderful!! It was really fun watching her being made. I especially like her jeweled belly button, needle-sculpting, and that glorious head of hair!
Smiles, Karen
I loved seeing how you creat these beautiful girls! They are truly wonderful. Make me happy to look at them!
Post a Comment